Every region of Italy has a different version of Easter Pie, or as my family calls it, Easter Pizza.  These pizzas are traditionally made with a sweet homemade pie crust.  Some families use ricotta cheese or vegetables. Others use sausage and rice.  In my extended family, everyone makes their own version but they all include ham and some kind of cheese.  This “pizza” is an easy, versatile dish that can be enjoyed at any time of the day, whether it be for Easter brunch or as an appetizer before your Easter dinner.  We usually serve ours as a hot appetizer but we eat it throughout the week.  My mother’s version of Easter Pizza is savory and easy, and is a hit every year.  No one makes this delicious Easter better than my beloved mother!  And this Easter, I am sharing this secret family recipe with you!
Fairytale Easter Pizza
(Serves 8)
Ingredients:
1 package of Pillsbury refrigerated pie crusts (2 crusts)
12-14 large eggs
3/4 cup of milk
1 cup of freshly grated Parmesan cheese
1 handful of chopped curly Italian parsley
1/2 pound of thin-sliced Munster cheese
1/2 pound of thin-sliced pepper ham
Salt + pepper
Directions:
1) Roll out one Pillsbury pie crust and fit into a 9 or 10 inch pie pan.

2) Crack all eggs into a bowl. Add milk. Beat with an electric mixer until the mixture becomes frothy and light.

3) Add the Parmesan cheese and parsley. Lightly beat again until combined.

4) Layer the bottom of the crust with a thin layer of the pepper ham.

 5) Add a layer of the Munster cheese on top of the ham.

6)  Top the ham and cheese layers with about 1/3 of the egg mixture, or just enough that the ham and cheese layers are covered.

7) Repeat step numbers 3 through 5 two or three times, laying the ham, cheese and egg mixture until the pie is filled. 

8) Once the pie is filled, roll out the second Pillsbury pie crust and gently lay on top of the pie, squeezing the ends of the two crusts together. Brush the top of the crust with an egg yolk.

9) Bake in a 350 degree oven for 45 minutes, or until a toothpick is inserted into the center and comes out dry.

10) Serve and enjoy! This pie tastes wonderful at room temperature, but I also enjoy it reheated in an oven. Can be made ahead of time.

Enjoy!
Hope everyone has a magical and happy Easter holiday!
For last years Easter blog, the Bunny Cake recipe, click here.

An Autumn Greeting 

“Come,” said the Wind to the Leaves one day. “Come over the meadow and we will play. Put on your dresses of red and gold. For summer is gone and the days grow cold.” 

~ Anonymous 

Burning bright hues of amber, orange and yellow are symbolic with the autumn season but these colors aren’t only found in the changing leaves. Squash is also in season and this butternut squash soup recipe is the perfect remedy for those cold days when your body and your spirit need a little touch of warmth.

The word squash is derived from the Native American Narragansett word askutasquash, which means “thing eaten raw.” It was documented by Rhode Island founder Roger Williams in 1643 in his book, “A Key into the Language of America.”

Though squash is commonly considered to be a vegetable for culinary purposes, it’s actually a fruit. The rule of thumb is that any part of a plant that contains seeds is a fruit. Vegetables are leafy parts of the plant or roots, like spinach or carrots. Thus, the exterior of the squash is known as the flesh and the interior is known as the pulp. Squash has many culinary uses but is also grown competitively. (See my photos of the giant pumpkins from the Bloomsburg Fair!) Squash was also made into pottery by people of the ancient Moche culture in Peru.

In North America, there are generally two groups of squash: summer squash (immature fruit) or autumn/winter squash (mature fruit).  The most popular type of summer squash is zuchinni. It is easy to grow and requires little cooking time or preparation.  Winter squash, like acorn squash or butternut squash, is a bit more heartier and requires a lengthy cooking time. (But oooohhh is it worth the wait!) Pumpkins and gourds are also winter squash.

Lady loves to lay next to the winter squash (pumpkins and gourds)!

Butternut squash, a large vibrant yellowish/orange fruit, is at it’s peak during the fall season. It’s known in Australia and New Zealand as a butternut pumpkin. It is thought to have originated in Mexico and is very popular in Mexican cuisine. Grown on a vine, butternut squash has a yellow flesh and bright orange pulp. The ripper it is, the sweeter the flavor.

Butternut squash can be used in both sweet and savory dishes. It is used in soups, salads, casseroles, breads, muffins, etc. It’s firm texture also makes it easy to grill and it is commonly found in South America as a side dish to barbecues. 

Butternut squash is a good source of fiber, Vitamin C, Vitamin A, magnessium and potassium. The best part about it is that it’s cheap and lasts for days. You can buy it and use it weeks later, at your own convenience.  Here is a classic recipe for a thick, velvety, flavorful butternut squash soup. It’s healthy, easy to make and guilt-free because it’s made without any cream.

Enjoy!
A large butternut squash cut in half.  When using, make sure to wash and discard the seeds.
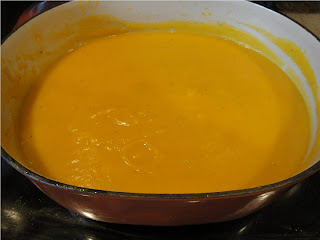
Fairytale Butternut Squash Soup


Ingredients:
3 tablespoons of extra virgin olive oil
1 tablespoon of butter (or butter substitute to save calories)
1 large butternut squash, halved lengthwise, washed, with the seeds discarded (about 3 lbs)
1 large yellow cooking onion, chopped
3 stalks of celery, chopped
2 tablespoons of fresh sage, chopped (a bunch of large leaves)
6 cups of chicken broth

Directions:
Preheat the oven to 400 degrees. Rub the olive oil on the cut side of the squash and season with salt and pepper. Place on a baking sheet and roast about 45 minutes until tender. Remove from the oven and let cool.

In a dutch oven over medium-high heat, add 2 tablespoons of olive oil and butter.  Add onion and celery. Sprinkle some salt. Saute about 10 minutes until tender.

Scoop out the butternut squash flesh (discarding the skin) into the pot. Add the chicken broth and a little salt to pot and bring to a boil. Turn heat down to low and let simmer for 30 minutes.

Remove from the heat and use a food processor or hand immersion blender to puree the soup.  You can also use a blender to puree the soup but make sure you work in batches!  Return to the pot and keep the soup warm.

Optional: You can give this soup a mexican flare by  adding some toasted pumpkin seeds (pepitas) and a drizzle of sour cream. For a hearty Italian flare, try dipping in some crusty bread, or hearty pumpernickel croutons and a sprinkle of Parmesan cheese. But it’s equally as good on its own! 🙂

“Alan Jackson Dip”
The Grand Ole Opry, Nashville, TN

The Grand Ole Opry reopened its doors to Music City last week, five months after the Cumberland River overflowed its banks and wreaked havoc onto the city of Nashville.  The Grand Ole Opry suffered heavy damage from the floods and underwent a massive restoration as a result. 

For those who are unfamiliar with the Grand Ole Opry, it is the world’s longest running radio program which features American country music, blue grass, folk, and gospel.  It is a weekly country music stage concert that has aired live on the radio and now television since 1925.  It is a tremendous honor to become a member of the Grand Ole Opry and some of its’ elite members include Hank Williams, Patsy Cline, Roy Acuff, Minnie Pearl, Johnny and June Carter Cash.  Modern country music members include Dolly Parton, Garth Brooks, Trisha Yearwood, Reba McIntire, Alan Jackson, Carrie Underwood, Trace Atkins, Dierks Bentley, Josh Turner and Brad Paisley.  Blake Shelton will be inducted as its newest member this year.

Even though it was displaced as a result of the May flooding, the Grand Ole Opry broadcasts were not disrupted and instead found a temporary home in other venues. Click here to see Dierks Bentley give a backstage tour of the restored Opry House on Facebook.

Grand Piano at the Opry House before the May 2010 flood.
 As a proud member of the Opry Fan Club, I was devastated to hear of the damage to the Opry house and the city of Nashville and am very happy to hear of its grand reopening. One of the best southern feasts I have ever had was actually at annual Opry Fan Club brunch. Being from the Northeast, I had never seen brunch served this way before and was really intrigued by the combination of ingredients. (Think: fruit salad, but smothered in some kind of mayonnaise or yogurt sauce, corn bread, pulled pork, etc. Not diet friendly, but delicious and very Paula Deen-esq.)
The Grand Ole Opry Fan Club
Annual Southern Brunch.

There is even an Opry cookbook, Around the Opry Table by Kay West, which features the favorite personal recipes of many Opry members.  Here is a recipe that I adopted from the feature on Alan Jackson. This dip is one of my go to recipes because it’s easy and is absolutely delicious and ADDICTING.  I make it often and when I don’t make it, everyone complains. It’s the perfect snack to accompany your it’s 5 o’clock somewhere beverage.
Alan Jackson in concert at the Mohegan Sun Arena in Wilkes Barre, PA.
Alan Jackson Dip
Ingredients
2 bags of reduced fat 2% shredded cheddar cheese (I like Sargento Natural or Kraft. Don’t get the finely shredded cheese for this recipe. The thicker cut, the better.)
1 container of large stuffed pimiento olives, chopped 
1/2 cup of reduced fat mayo
salt and pepper
Optional: Franks hot sauce
Assorted crackers or pita chips to dip with!

Directions
Mix together the above ingredients in a large bowl and serve! If you want to give it a quick, add in some Frank’s hot sauce. Really, that’s it!

Jumbo stuffed pimiento Spanish olives.

Enjoy!

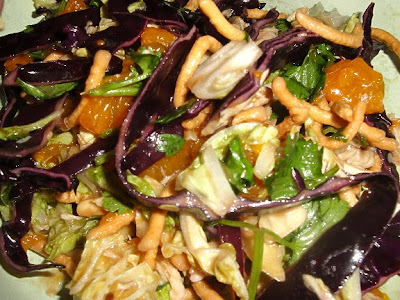
Anyone who knows me well knows that I have never been a huge fan of Chinese food. It’s alright and I will eat it if it’s there, but I favor other cuisines. The exception: this salad, a mix of chinese and new american flavors. It is crunchy, tangy, and incredibly fresh tasting (thanks to the cilantro!) I came up with this recipe after seeing it made several different ways in a few cookbooks that I have. Sometimes I make my own dressing but to keep it simple this time I just opted to use the Newman’s Own Low-Fat Seasame Ginger Salad Dressing. Boy, was I glad I did – the flavors were amazing!

I recently made this salad for the barbecue that I spoke about in my berry strata posting. I was really surprised at the overwhelmingly positive response I got from everyone! After one nameless individual who is normally a vegan unabashedly proclaimed that it was the best salad she had ever tasted, I knew it would be worthy a Fairytale Feast posting.

DIANA’S CHINESE CHICKEN SLAW SALAD
Serves 6 (maybe more, depending on how hungry you are!)

Ingredients:
1 head red cabbage
1 head Napa Cabbage
2 chicken breasts, shredded (I used all white meat from Wegman’s plain Rotissieri Chicken)
2 cups cilantro
1 jar Dole mandarin oranges (drained)
3/4 cup slivered almonds
1 teaspoon sugar
La Choy Chow Mein Noodles
1/2 bottle of Newman’s Own Low-Fat Seasame Ginger Salad Dressing

Optional Ingredients (I didn’t add them here):
water chestnuts (sliced, drained)
shredded carrot

Direstions: Slice red cabbage and napa cabbage into thin strips. Discard cores. In a large salad bowl, toss cabbage and sprinkle with sugar.  Shred chicken and add to cabbage. Chop cilantro, discardding stems, and add to bowl.  Add slivered almonds. Mix well.

When ready to serve, add 1 jar drained mandarin oranges. Top with noodles. Season with dressing.  Mix well. Serve immediately.

Enjoy!


SPRING IS HERE! For some reason I associated Spring with berries and pies – the kinds you would see on the cover of Southern Living Magazine. Berry pies. Cherry Pies. Strawberry pies. Rhubarb pies. Strawberry – Rhubarb pies.  It doesn’t matter. It if looks pretty, I’ll try it. Unfortunately, when it comes to baking a pie, I am a seasoned failure in this area.  My solution when I’m craving a homemade berry pie? A berry strata by Giada DiLaurentis, which combines two of my favorite ingredients: bread and berries. It’s a simple, no fuss recipe and it tastes fantastic.  It manages to taste gooey and rich while retaining the sweet full fruit flavor from the berries.


Anther reason I love this recipe is because you can make it hours ahead of time and then bake it when you are ready. Recently, I went to my first barbecue of the season and I decided to make this strata. I made it almost exactly according to this recipe except I used 1% milk (that is all I had on hand and it saved a few calories).  I used a country-style farm bread from Wegmans and cut it into 1 inch pieces. I may have used more than 4 pieces but I did not use the whole loaf.  I probably should have coated the bread more evenly in the mixture and was a little disappointed with myself about it but no one else seemed to mind.  I let it refrigerate for about four hours and then I baked it on location at the barbecue. The result was a big hit! I hope you will enjoy it as much as we all did!


Berry Strata 

by Giada DiLaurentis

Ingredients

  • 2 tablespoons butter
  • 3 tablespoons honey
  • 4 large eggs
  • 1/2 cup whole milk ricotta
  • 3 tablespoons sugar
  • 1 cup whole milk
  • 1/4 cup orange juice
  • 4 slices of bread, torn into 1-inch pieces (about 4 cups)
  • 1 (10-ounce) bag frozen mixed berries, thawed and drained

Directions

Melt the butter in a small saucepan over low heat. Turn off the heat, add the honey, and stir to combine.
Meanwhile, in a large bowl combine the eggs, ricotta, and sugar. Using a fork, mix to combine and beat the eggs. Add the milk, orange juice, butter and honey mixture, and bread. Stir to combine. Gently fold in the berries.
Place the ingredients in a 10-inch round (2-quart) baking dish. Cover with plastic wrap and place in the refrigerator for at least 2 hours and up to 12 hours.
Preheat the oven to 350 degrees F. Bake the strata until golden on top and baked through, about 40 minutes. Let stand for 5 minutes before serving. Spoon into dishes and serve.

(Strata before baking)

In my desire to “eat clean” this week in hopes of detoxifying my body from my edible holiday sins, I decided to make chicken tonight. (After all, what other choices are there really when you are “dieting,” besides chicken, turkey or plain fish?) 

Now, I’ve never been a big fan of chicken and would pick a rare, juicy steak or a succulent piece of fresh seafood over the bland bird anyday. Chicken can easily become dry and tasteless to me. But there ARE recipes out there that give it a little zest and this is one of them! 

This chicken with artichokes and melted lemons is a recipe from Bob Greene, Oprah’s trainer and diet guru. In my opinion, Greene has some of the tastiest recipes around to ensure one stays on a path to their “best life.”  This one, taken from his “Best Life Diet,” is sure to awaken your senses and excite your taste buds without breaking your diet bank. 

Warning: this dish is for LEMON LOVERS ONLY! It is a little tart –  so if you are wary, go light on the lemon juice. If you are a lemon lover, as I am, then you HAVE to try this!  Let me know what you think!


Chicken with Artichokes and Melted Lemons

“Simple and elegant, this is the kind of dish that’s perfect for entertaining.” ~ Bob Green
  • 2 teaspoons olive oil
  • 4 pieces boneless skinless chicken breasts (about 1 pound)
  • Juice of 1 lemon
  • 3/4 cup chicken stock or canned low-sodium chicken broth, such as Health Valley no-salt-added chicken broth or Pacific Foods low-sodium chicken broth
  • 1 lemon, thinly sliced
  • 2 tablespoons capers with juice
  • One 14-ounce can quartered artichoke hearts, drained
  • Salt and freshly ground black pepper


Heat the oil in an 8-inch skillet over medium-high heat.  When the oil is heated, swirl it to cover the bottom of the pan.  Add the chicken breasts and sear them until browned.  Turn the chicken breasts and brown them on the other side.  Remove the chicken to a plate and increase the heat to high.  Deglaze the pan with the lemon juice, scraping up any browned bits into the sauce.

Add the stock and bring to a simmer.  Add the lemon slices to the pan, reduce the heat to medium, and place the chicken breasts on top of the lemon slice.  Add the capers, cover, reduce the heat to medium, and cook, covered, for 10 minutes.  Remove the lid and add the drained artichoke hearts.  Cover and continue cooking for 5 minutes, or until the breasts are cooked through.

Remove the chicken to a warm plate.  Increase the temperature and reduce the sauce to a glaze.  Taste the  sauce and adjust the seasoning with salt and pepper as needed.  Just a little salt will reduce the acidity of the lemon, capers, and artichoke hearts and balance the flavors.  Serve the chicken with the artichoke hearts, capers, and melted lemon drizzled with the glaze.

Serves: 4

Per serving, about: Calories, 186; Protein 29 g; Carbs 34 g; Dietary Fiber 6g; Total Fat 4g; Saturated Fat 1 g


Enjoy!